Hello Folks,
This article is all about integrating Cortana(Virtual Voice-activated Personal Assistant) with out app.This means, when user give any instruction/ask question to Cortana related to our app or the thing which your app can fulfil. In this case Cortana communicate with our app and respond back to user accordingly.
To use Cortana, your device must have proper region set with the language pack installed which Cortana understands.
In this article i am going to explain step by step procedure to integrate Cortana with UWP app.
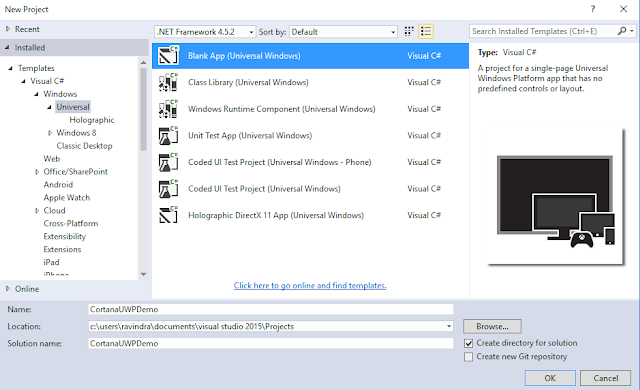
Open Visual Studio 2015 -> New Project -> Visual C# ->Windows -> Universal -> Blank App

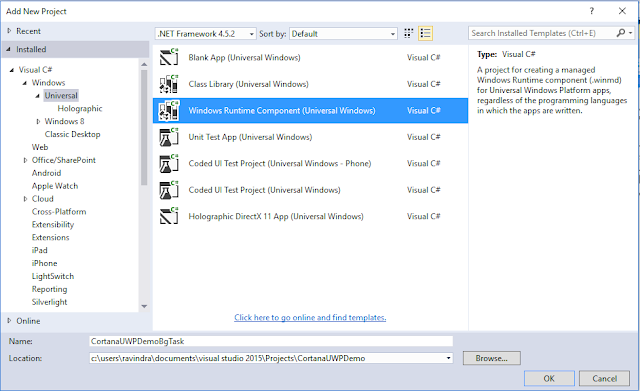
Now lets add Windows Runtime Component which act as a background AppService for this app and gets activate whenever user ask anything to Cortana with the name of our app.We'll see it later.
Right Click on solution -> Add new project -> Add Windows Runtime Component

Now add a Voice Command Definition (VCD) file into our app, which we need to install on app launch.
Copy paste below code in your VCD file.
Here, i added multiple command sets for en-us and en-in.Where,
AppName : Cortana will listen user only with this app name as a prefix of the sentence(Example : Assistant I want to travel near areas.).
Feedback : Text Shows to user while working on creating user response after user queries/ask something.VoiceCommandService : The name of a App service which activates on calling a AppName or CommandPrefix by user.
PhraseTopic : You can add multiple phrase inside this PhraseTopic for better response and understanding the user.
Lets write a code in our app to install this VCD file.
Call above method from OnLaunched() of app.xaml.cs file.
Now, we are done with making VCD file,installing VCD file from App, added a Runtime Component into a solution.It's time to give reference of background service to our app.
CortanaUWPDemo -> References -> Right Click ->Add Reference -> Project -> Solution -> Check CortanaUWPDemoBgTask -> Click Ok
Now the reference of Background service has been added into your UWP app.Now,we need to add BackgroundTask into Windows Runtime Component project.
CortanaUWPDemoBgTask -> Add New item ->Class -> CortanaBackgroundTask
Implements a IBackgrountTask Interface
This background task(Run()) will called on every voice command by user.
Now add some code for Voice Command Connection and get the text out of it, what user said.
here is the updated code for the Background task.
Now, we've done with our Background App Service.Let our UWP app knows about it.
Add, this below code in package.appmanifest file.
Now, we've done all the stuffs, Its time to run our app :)
Watch output here
Download Source Code from here
This article is all about integrating Cortana(Virtual Voice-activated Personal Assistant) with out app.This means, when user give any instruction/ask question to Cortana related to our app or the thing which your app can fulfil. In this case Cortana communicate with our app and respond back to user accordingly.
To use Cortana, your device must have proper region set with the language pack installed which Cortana understands.
In this article i am going to explain step by step procedure to integrate Cortana with UWP app.
Open Visual Studio 2015 -> New Project -> Visual C# ->Windows -> Universal -> Blank App

Now lets add Windows Runtime Component which act as a background AppService for this app and gets activate whenever user ask anything to Cortana with the name of our app.We'll see it later.
Right Click on solution -> Add new project -> Add Windows Runtime Component

Now add a Voice Command Definition (VCD) file into our app, which we need to install on app launch.
A voice command is a single utterance with a specific intent, defined in a Voice Command Definition (VCD) file, directed at an installed app through Cortana.
A VCD file defines one or more voice commands, each with a unique intent.
CortanaUWPDemo -> Add ->New Item ->XML File
A VCD file defines one or more voice commands, each with a unique intent.
CortanaUWPDemo -> Add ->New Item ->XML File
<?xml version="1.0" encoding="utf-8"?><VoiceCommands xmlns="http://schemas.microsoft.com/voicecommands/1.2"> <!--For English US language--> <CommandSet xml:lang="en-us" Name="examplevcd"> <AppName>Assistant</AppName> <Example>Ask your query to assistant regarding travels</Example> <Command Name="YourKeyword"> <Example>I want to travel near areas</Example> <ListenFor>{UserCommand}</ListenFor> <Feedback>In progress...</Feedback> <VoiceCommandService Target="CortanaBackgroundTask"/> </Command> <PhraseTopic Label="UserCommand" Scenario="Natural Language"> </PhraseTopic> </CommandSet> <!--For English-India Language--> <CommandSet xml:lang="en-in" Name="examplevcd"> <AppName>Assistant</AppName> <Example>Ask your query to assistant regarding travels</Example> <Command Name="YourKeyword"> <Example>I want to travel near areas</Example> <ListenFor>{UserCommand}</ListenFor> <Feedback>In progress...</Feedback> <VoiceCommandService Target="CortanaBackgroundTask"/> </Command> <PhraseTopic Label="UserCommand" Scenario="Natural Language"> </PhraseTopic> </CommandSet></VoiceCommands>Here, i added multiple command sets for en-us and en-in.Where,
AppName : Cortana will listen user only with this app name as a prefix of the sentence(Example : Assistant I want to travel near areas.).
Feedback : Text Shows to user while working on creating user response after user queries/ask something.VoiceCommandService : The name of a App service which activates on calling a AppName or CommandPrefix by user.
PhraseTopic : You can add multiple phrase inside this PhraseTopic for better response and understanding the user.
Lets write a code in our app to install this VCD file.
public async Task InstallVCD() { try { StorageFile vcdStorageFile = await Package.Current.InstalledLocation.GetFileAsync(@"VCD.xml"); await Windows.ApplicationModel.VoiceCommands.VoiceCommandDefinitionManager.InstallCommandDefinitionsFromStorageFileAsync(vcdStorageFile); } catch (Exception ex) { } }Call above method from OnLaunched() of app.xaml.cs file.
Now, we are done with making VCD file,installing VCD file from App, added a Runtime Component into a solution.It's time to give reference of background service to our app.
CortanaUWPDemo -> References -> Right Click ->Add Reference -> Project -> Solution -> Check CortanaUWPDemoBgTask -> Click Ok
Now the reference of Background service has been added into your UWP app.Now,we need to add BackgroundTask into Windows Runtime Component project.
CortanaUWPDemoBgTask -> Add New item ->Class -> CortanaBackgroundTask
Implements a IBackgrountTask Interface
public sealed class CortanaBackgroundTask : IBackgroundTask { public void Run(IBackgroundTaskInstance taskInstance) { } }This background task(Run()) will called on every voice command by user.
Now add some code for Voice Command Connection and get the text out of it, what user said.
here is the updated code for the Background task.
public sealed class CortanaBackgroundTask : IBackgroundTask { BackgroundTaskDeferral serviceDeferral; VoiceCommandServiceConnection voiceServiceConnection; public async void Run(IBackgroundTaskInstance taskInstance) { serviceDeferral = taskInstance.GetDeferral(); taskInstance.Canceled += OnTaskCanceled; var triggerDetails = taskInstance.TriggerDetails as AppServiceTriggerDetails; // This should match the uap:AppService and VoiceCommandService references from the // package manifest and VCD files, respectively. Make sure we've been launched by // a Cortana Voice Command. if (triggerDetails != null && triggerDetails.Name == "CortanaBackgroundTask") { try { voiceServiceConnection = VoiceCommandServiceConnection.FromAppServiceTriggerDetails( triggerDetails); voiceServiceConnection.VoiceCommandCompleted += OnVoiceCommandCompleted; // GetVoiceCommandAsync establishes initial connection to Cortana, and must be called prior to any // messages sent to Cortana. Attempting to use ReportSuccessAsync, ReportProgressAsync, etc // prior to calling this will produce undefined behavior. VoiceCommand voiceCommand = await voiceServiceConnection.GetVoiceCommandAsync(); var text = voiceCommand.SpeechRecognitionResult.Text; if (text.Equals("I")) { RespondTouser("Hi, How are your doing ?"); } else { //Here you call up any api's to create a meaning full response to user/call services like Bot/Luis etc... to create a meaningful response. RespondTouser("You Said ," + text); } } catch (Exception ex) { } } } private async void RespondTouser(string text) { var userMessage = new VoiceCommandUserMessage(); string keepingTripToDestination = text; //How can i Help you? userMessage.DisplayMessage = userMessage.SpokenMessage = keepingTripToDestination; VoiceCommandResponse response = VoiceCommandResponse.CreateResponse(userMessage); await voiceServiceConnection.ReportSuccessAsync(response); } private void OnVoiceCommandCompleted(VoiceCommandServiceConnection sender, VoiceCommandCompletedEventArgs args) { if (this.serviceDeferral != null) { this.serviceDeferral.Complete(); } } private void OnTaskCanceled(IBackgroundTaskInstance sender, BackgroundTaskCancellationReason reason) { if (this.serviceDeferral != null) { this.serviceDeferral.Complete(); } } }Now, we've done with our Background App Service.Let our UWP app knows about it.
Add, this below code in package.appmanifest file.
<Extensions> <uap:Extension Category="windows.appService" EntryPoint="CortanaUWPDemoBgTask.CortanaBackgroundTask"> <uap:AppService Name="CortanaBackgroundTask" /> </uap:Extension> <uap:Extension Category="windows.personalAssistantLaunch" /></Extensions>Now, we've done all the stuffs, Its time to run our app :)
Watch output here
Download Source Code from here

No comments:
Post a Comment